
The Ultimate Guide to Keyboard Clean Tools: Keeping Your Keyboard Germ-Free
In today’s digital age, keyboards are indispensable tools for work, communication, and entertainment. However, they also become breeding grounds for dust, crumbs, and germs. Maintaining a clean keyboard is not only about aesthetics but also about hygiene and extending the lifespan of your device. This comprehensive guide explores the various keyboard clean tools available and provides practical tips for keeping your keyboard spotless and functioning optimally.
Why Keyboard Cleaning Matters
Keyboards accumulate a surprising amount of debris over time. Think about it: you’re touching it multiple times a day. Food particles, dust, skin cells, and even pet hair find their way into the crevices. This accumulation can lead to several problems:
- Hygiene: Keyboards can harbor bacteria and viruses, posing a health risk.
- Functionality: Debris can interfere with key functionality, causing sticking or unresponsiveness.
- Lifespan: Regular cleaning prevents the buildup of corrosive substances that can damage internal components.
- Aesthetics: A clean keyboard simply looks and feels better.
Essential Keyboard Clean Tools
Fortunately, a variety of keyboard clean tools are available to tackle these issues. Here’s a breakdown of the most effective options:
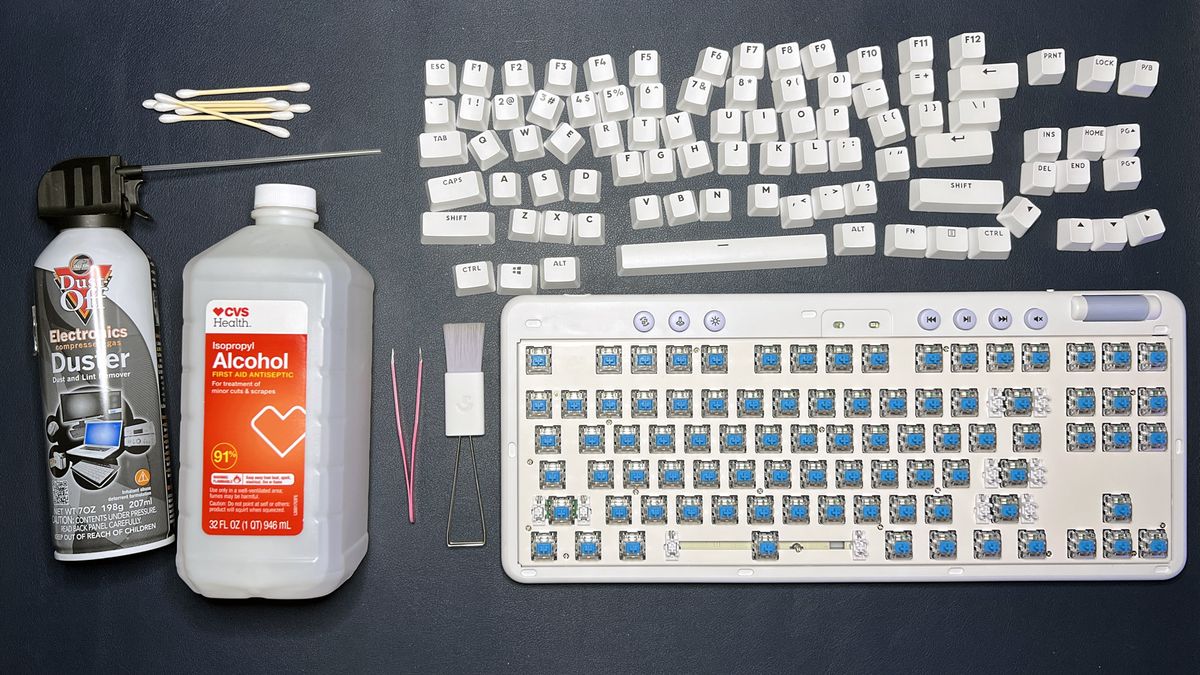
Compressed Air
Compressed air is a staple for keyboard cleaning. It effectively dislodges loose particles from hard-to-reach areas. Use short bursts to avoid damaging sensitive components. Always hold the can upright to prevent liquid propellant from spraying onto the keyboard. This is a crucial part of any good keyboard clean tool set.
Microfiber Cloths
Microfiber cloths are excellent for wiping down the surface of your keyboard and removing smudges and fingerprints. They are soft, non-abrasive, and won’t scratch the keys. Dampen the cloth slightly with water or a keyboard-specific cleaning solution for better results. Avoid using harsh chemicals or abrasive cleaners. [See also: Best Practices for Cleaning Electronic Devices]
Keyboard Cleaning Gel
Keyboard cleaning gel, also known as cleaning slime, is a pliable substance that conforms to the shape of your keyboard. It effectively picks up dust and debris from between the keys. Simply press the gel onto the keyboard, let it sit for a few seconds, and then peel it off. Be careful not to leave any residue behind. It’s a fun and effective keyboard clean tool.
Keycap Puller
For a deep clean, consider removing the keycaps. A keycap puller is a small tool designed to safely remove keycaps without damaging them or the keyboard. This allows you to access the areas beneath the keys and thoroughly clean them. This is a more advanced keyboard clean tool for serious cleaning.
Small Brushes
Small brushes, such as those used for makeup or detailing, are useful for scrubbing away stubborn dirt and grime. Choose brushes with soft bristles to avoid scratching the keys. They are particularly effective for cleaning around the edges of the keys. A good keyboard clean tool for precision work.
Vacuum Cleaners (with attachments)
A vacuum cleaner with a brush attachment can be used to remove loose debris from the keyboard. Use a low suction setting to avoid damaging the keys. Be careful not to suck up any keycaps. A good option to have, but use it carefully as a keyboard clean tool.
Step-by-Step Keyboard Cleaning Guide
Follow these steps for a thorough keyboard cleaning:
- Power Down: Turn off your computer and unplug the keyboard. This prevents accidental keystrokes and potential electrical damage.
- Shake It Out: Turn the keyboard upside down and gently shake it to dislodge any loose debris.
- Compressed Air: Use compressed air to blow out dust and crumbs from between the keys.
- Wipe Down: Wipe the surface of the keyboard with a microfiber cloth dampened with water or a keyboard-specific cleaning solution.
- Deep Clean (Optional): If desired, use a keycap puller to remove the keycaps and clean the areas beneath them.
- Brush Away: Use a small brush to scrub away any stubborn dirt or grime.
- Vacuum (Optional): Use a vacuum cleaner with a brush attachment to remove any remaining debris.
- Reassemble: Replace the keycaps (if removed).
- Sanitize: Wipe the keyboard with a disinfecting wipe to kill any remaining germs.
- Dry: Allow the keyboard to dry completely before plugging it back in.
Choosing the Right Keyboard Clean Tools for Your Needs
The best keyboard clean tools for you will depend on your specific needs and preferences. If you just need a quick clean, compressed air and a microfiber cloth may suffice. For a more thorough clean, you may want to consider using a keycap puller, small brushes, and keyboard cleaning gel. Consider how often you’ll be cleaning and the types of messes you typically encounter. [See also: Ergonomic Keyboard Setup Guide]
DIY Keyboard Cleaning Solutions
While specialized keyboard clean tools are readily available, you can also create your own DIY cleaning solutions. A mixture of water and a mild dish soap can be used to dampen a microfiber cloth. Avoid using harsh chemicals or abrasive cleaners, as they can damage the keyboard. Always test any cleaning solution on a small, inconspicuous area of the keyboard first to ensure that it doesn’t cause any discoloration or damage.
Preventing Keyboard Dirt Buildup
Prevention is always better than cure. Here are some tips for preventing keyboard dirt buildup:
- Wash Your Hands: Wash your hands regularly, especially before using the keyboard.
- Avoid Eating Near the Keyboard: Food particles are a major source of keyboard dirt.
- Use a Keyboard Cover: A keyboard cover can protect the keyboard from dust and spills.
- Clean Regularly: Clean your keyboard regularly, even if it doesn’t look dirty.
Advanced Keyboard Cleaning Techniques
For keyboards with more intricate designs or mechanical switches, more advanced cleaning techniques may be required. Research specific cleaning instructions for your keyboard model to avoid causing damage. Consider consulting a professional keyboard cleaner if you are unsure about how to proceed. Using the right keyboard clean tool is important here.
Troubleshooting Common Keyboard Cleaning Issues
Sometimes, despite your best efforts, you may encounter issues during the keyboard cleaning process. Here are some common problems and how to solve them:
- Sticky Keys: If your keys are still sticky after cleaning, try using a small amount of isopropyl alcohol to dissolve any remaining residue.
- Keycap Damage: If you accidentally damage a keycap, you may be able to purchase a replacement online.
- Keyboard Malfunction: If your keyboard malfunctions after cleaning, unplug it and allow it to dry completely before plugging it back in. If the problem persists, consult a professional technician.
The Future of Keyboard Cleaning
As technology advances, we can expect to see even more innovative keyboard clean tools and techniques emerge. Self-cleaning keyboards, antimicrobial coatings, and advanced cleaning solutions are all possibilities for the future. The ongoing emphasis on hygiene and device longevity will continue to drive innovation in this area.
Conclusion
Maintaining a clean keyboard is essential for hygiene, functionality, and longevity. By using the right keyboard clean tools and following the steps outlined in this guide, you can keep your keyboard spotless and functioning optimally. Whether you opt for simple compressed air and a microfiber cloth or a more comprehensive cleaning kit, regular cleaning is a worthwhile investment in your health and productivity. Remember to choose the tools that best suit your needs and always prioritize safety and caution throughout the cleaning process. A clean keyboard is a happy keyboard!
