How to Take Tar Off Your Car: A Comprehensive Guide
Discovering tar on your car can be frustrating. Those small, black spots not only detract from your vehicle’s appearance but can also damage the paint if left untreated. This comprehensive guide provides step-by-step instructions and expert tips on how to take tar off your car safely and effectively, ensuring your vehicle looks its best. We’ll cover everything from identifying tar spots to selecting the right cleaning products and implementing preventative measures. Let’s dive in!
Understanding Tar and Its Effects on Your Car
Tar is a sticky, dark substance that is a byproduct of asphalt and other petroleum-based materials. It’s commonly found on roads and highways, and vehicles often pick it up while driving. The heat from the road softens the tar, allowing it to easily adhere to your car’s paint, wheels, and other surfaces. Understanding what you’re dealing with is the first step in learning how to take tar off your car.
Left untreated, tar can cause several problems:
- Paint Damage: Tar can penetrate the clear coat of your car’s paint, leading to discoloration and etching.
- Reduced Shine: The build-up of tar can dull the overall appearance of your car.
- Increased Cleaning Difficulty: The longer tar sits on your car, the harder it becomes to remove.
Identifying Tar Spots on Your Car
Tar spots are usually easy to identify. They appear as small, black, or dark brown specks on your car’s surface, typically concentrated on the lower panels, wheel wells, and bumpers. These areas are most susceptible to road debris. Regular inspection of your vehicle will help you spot tar early, making it easier to remove.
Essential Tools and Products for Tar Removal
Before you start the tar removal process, gather the necessary tools and products. Using the right equipment will make the job easier and prevent damage to your car’s paint. Here’s what you’ll need:
- Tar Remover: Choose a dedicated tar remover specifically designed for automotive use. These products contain solvents that dissolve tar without harming the paint.
- Microfiber Towels: Soft microfiber towels are essential for wiping away the tar remover and buffing the surface.
- Wash Mitt: A high-quality wash mitt is needed for pre-cleaning your car.
- Car Wash Soap: Use a pH-balanced car wash soap to clean your car before and after tar removal.
- Spray Bottle: A spray bottle is useful for applying the tar remover.
- Detailing Brush: A soft-bristled detailing brush can help loosen stubborn tar spots.
- Clay Bar (Optional): A clay bar can be used to remove any remaining residue after the tar is gone.
- Wax or Sealant (Optional): Applying wax or sealant after tar removal will protect your car’s paint.
Step-by-Step Guide: How to Take Tar Off Your Car
Follow these steps to safely and effectively remove tar from your car:
Step 1: Wash Your Car
Before applying any tar remover, thoroughly wash your car to remove dirt and debris. This prevents scratching the paint during the tar removal process. Use a pH-balanced car wash soap and a wash mitt, and rinse thoroughly with clean water.
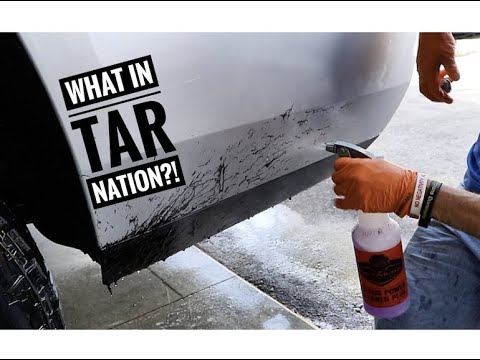
Step 2: Apply Tar Remover
Spray the tar remover directly onto the tar spots. Follow the manufacturer’s instructions for the recommended dwell time, typically a few minutes. Avoid applying the remover in direct sunlight or on hot surfaces, as this can cause it to dry too quickly and potentially damage the paint. A good tar remover is key to effectively take tar off your car.
Step 3: Gently Wipe Away the Tar
After the dwell time, gently wipe away the tar with a clean microfiber towel. Use a circular motion and apply light pressure. For stubborn spots, use a detailing brush to gently loosen the tar before wiping. Avoid excessive rubbing, as this can scratch the paint.
Step 4: Re-Wash the Area
Once you’ve removed the tar, re-wash the affected area with car wash soap and water. This removes any remaining tar remover and ensures a clean surface. Rinse thoroughly and dry with a clean microfiber towel.
Step 5: Inspect and Repeat if Necessary
Inspect the area for any remaining tar spots. If necessary, repeat steps 2-4 until all the tar is removed. Be patient and avoid using excessive force.
Step 6: Clay Bar Treatment (Optional)
If there is any residual tar or contaminants left on the paint, use a clay bar to remove them. Lubricate the surface with clay bar lubricant and gently glide the clay bar over the area. This will leave your paint smooth and clean.
Step 7: Apply Wax or Sealant (Optional)
After removing the tar, protect your car’s paint by applying a layer of wax or sealant. This will help prevent future tar buildup and keep your car looking its best. Follow the manufacturer’s instructions for application and buffing.
Tips for Preventing Tar Buildup
Preventing tar buildup is easier than removing it. Here are some tips to help protect your car:
- Avoid Driving on Freshly Paved Roads: If possible, avoid driving on roads that have recently been paved or sealed.
- Regular Washing: Wash your car regularly to remove dirt, debris, and tar before it has a chance to bond with the paint.
- Apply a Protective Coating: Applying a wax or sealant to your car’s paint will provide a protective barrier against tar and other contaminants.
- Use Mud Flaps: Mud flaps can help prevent tar and road debris from splashing onto your car’s lower panels.
Choosing the Right Tar Remover
There are many tar removers available on the market, so it’s important to choose one that is safe and effective for your car’s paint. Look for products that are specifically designed for automotive use and contain solvents that dissolve tar without harming the clear coat. Reading reviews and comparing products can help you make an informed decision. Make sure the tar remover is safe to use to take tar off your car without damaging the paint.
Common Mistakes to Avoid When Removing Tar
Avoiding these common mistakes will help you safely and effectively remove tar from your car:
- Using Abrasive Cleaners: Avoid using abrasive cleaners or scouring pads, as these can scratch your car’s paint.
- Applying Excessive Pressure: Don’t apply excessive pressure when wiping away the tar, as this can also scratch the paint.
- Using Harsh Solvents: Avoid using harsh solvents like acetone or lacquer thinner, as these can damage the clear coat.
- Ignoring Manufacturer’s Instructions: Always follow the manufacturer’s instructions for the tar remover.
Alternative Tar Removal Methods
While dedicated tar removers are the most effective solution, there are some alternative methods you can try:
- WD-40: WD-40 can sometimes dissolve tar. Spray it onto the tar spots, let it sit for a few minutes, and then wipe it away with a microfiber towel.
- Peanut Butter: The oils in peanut butter can help loosen tar. Apply a small amount to the tar spots, let it sit for a few minutes, and then wipe it away.
- Cooking Oil: Similar to peanut butter, cooking oil can help dissolve tar. Apply it to the tar spots, let it sit, and then wipe it away.
Note: Always test these alternative methods in an inconspicuous area first to ensure they don’t damage your car’s paint.
Professional Detailing Services
If you’re not comfortable removing tar yourself, or if the tar buildup is severe, consider hiring a professional detailing service. Professional detailers have the experience, tools, and products to safely and effectively remove tar without damaging your car’s paint. They can also provide other detailing services, such as paint correction and ceramic coating, to keep your car looking its best. Let a professional take tar off your car if you are not confident in doing it yourself.
Conclusion
Removing tar from your car is a manageable task with the right tools, products, and techniques. By following the steps outlined in this guide, you can safely and effectively take tar off your car and keep it looking its best. Remember to take preventative measures to minimize tar buildup and regularly inspect your vehicle for any signs of tar. With a little effort, you can maintain your car’s appearance and protect its paint from the damaging effects of tar. [See also: Best Car Cleaning Products] [See also: How to Detail Your Car at Home]
