
How to Replace a Brake Cable on Your Bicycle: A Comprehensive Guide
Bicycle brakes are a critical safety component, ensuring you can stop quickly and safely. A worn or frayed brake cable can compromise your braking performance, making it essential to know how to replace brake cable bicycle components when necessary. This comprehensive guide provides a step-by-step walkthrough of the process, ensuring you can perform this maintenance task with confidence.
Why Replace Your Brake Cable?
Several factors can necessitate a replace brake cable bicycle procedure. Over time, brake cables can stretch, fray, or corrode, leading to reduced braking efficiency. Regular inspection of your brake cables is crucial to identify any signs of wear and tear. Common indicators include:
- Difficulty engaging the brakes
- Sluggish brake response
- Visible fraying or rust on the cable
- Increased hand lever travel
Ignoring these signs can lead to brake failure, posing a significant safety risk. Replacing your brake cable promptly ensures optimal braking performance and enhances your safety on the road or trail. Knowing when and how to replace brake cable bicycle parts is part of responsible bike ownership.
Tools and Materials Needed
Before you begin the replace brake cable bicycle process, gather the necessary tools and materials. Having everything on hand will streamline the process and prevent unnecessary delays. Here’s a checklist:
- New brake cable (ensure it’s the correct type for your bike)
- Cable cutters
- Allen wrench set
- Pliers
- Screwdriver (Phillips or flathead, depending on your brake lever)
- Brake cable crimps (ferrules)
- Cable housing (optional, but recommended if the existing housing is worn)
- Grease or lubricant
Having these tools prepared will ensure a smooth and efficient replace brake cable bicycle experience.
Step-by-Step Guide to Replacing Your Brake Cable
Follow these detailed steps to safely and effectively replace brake cable bicycle components:
Step 1: Loosen the Existing Brake Cable
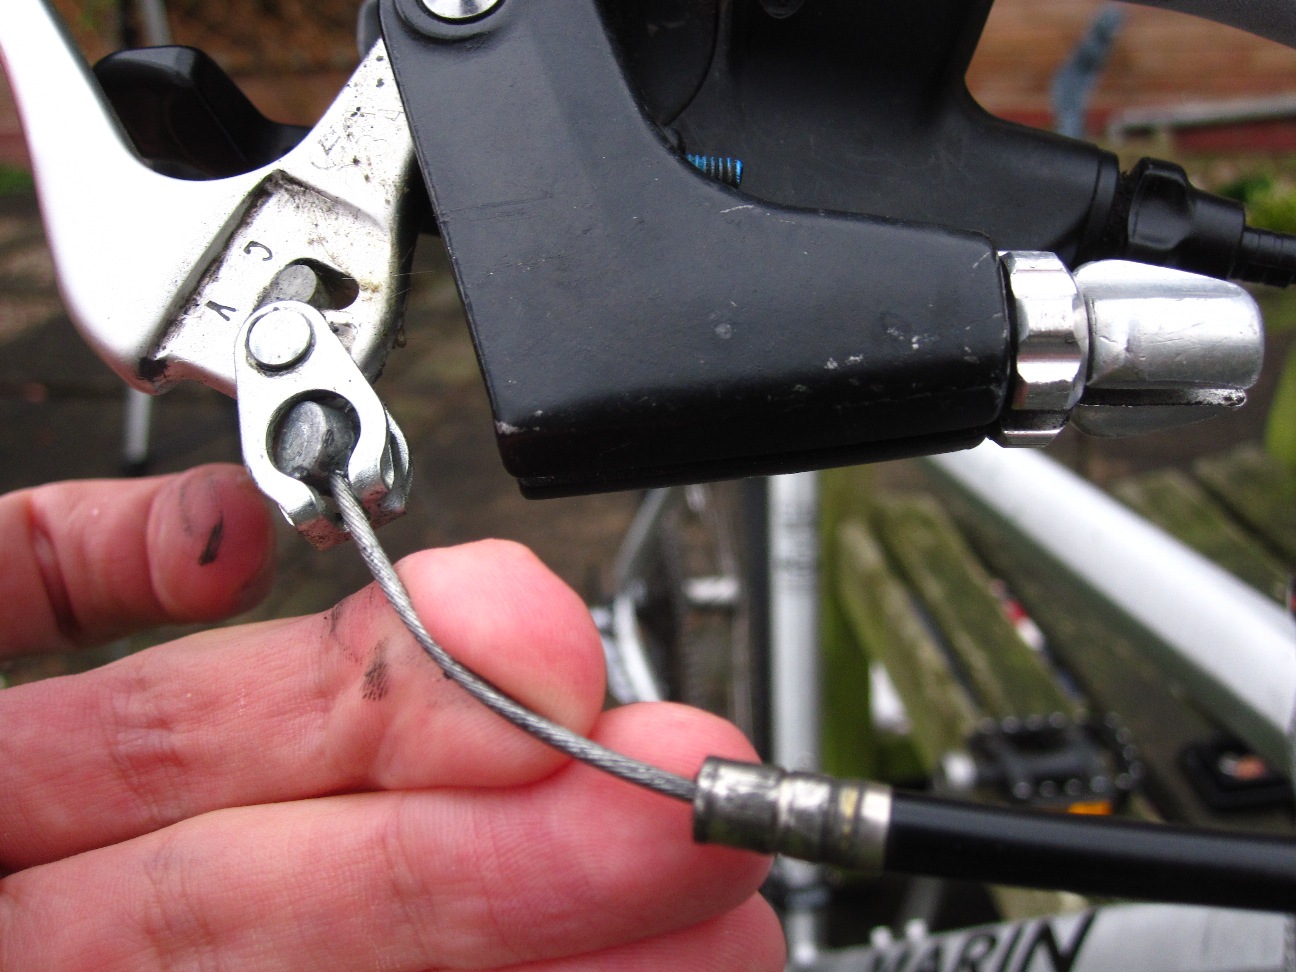
Start by loosening the brake cable at the brake caliper. Use an Allen wrench to loosen the cable fixing bolt. This will allow you to detach the old cable from the brake mechanism. Make sure to note how the old cable is routed before completely removing it. This will help you with the installation of the new cable.
Step 2: Remove the Old Brake Cable
Once the cable is loose, disconnect it from the brake lever. Some levers have a small access port where you can push the cable end out, while others require you to partially disassemble the lever. Carefully pull the old cable out of the housing, working from the brake lever down to the caliper. If the cable is stuck, try using pliers to gently coax it out.
Step 3: Inspect and Replace the Cable Housing (Optional)
While the cable is removed, inspect the brake cable housing for any signs of damage, such as cracks, kinks, or corrosion. If the housing is damaged, it’s best to replace it along with the cable. Use cable cutters to cut the new housing to the correct length, ensuring it fits properly between the brake lever and the caliper. Lubricate the inside of the housing with grease or lubricant to reduce friction.
Step 4: Install the New Brake Cable
Thread the new brake cable through the brake lever and down through the housing. Ensure the cable follows the same route as the old cable. This is where your earlier observations will come in handy. Guide the cable through any cable guides or stops along the frame. Once the cable reaches the brake caliper, pull it taut and secure it with the cable fixing bolt. Tighten the bolt firmly, but avoid over-tightening, which could damage the cable.
Step 5: Adjust the Brakes
After securing the cable, adjust the brakes to ensure proper engagement and release. Most brake calipers have an adjustment barrel that allows you to fine-tune the cable tension. Turn the barrel to adjust the brake pads closer to or further from the rim or rotor. The goal is to achieve a responsive brake feel without the pads rubbing against the rim or rotor when the brakes are not engaged.
Step 6: Test the Brakes
Before riding your bike, thoroughly test the brakes to ensure they are functioning correctly. Squeeze the brake levers firmly and check for smooth and consistent braking power. Make sure the brakes release fully when you release the levers. If the brakes feel spongy or weak, double-check the cable tension and adjustment. Repeat the adjustment process as needed until you achieve optimal braking performance.
Step 7: Trim and Crimp the Cable End
Once you are satisfied with the brake adjustment, trim the excess cable with cable cutters, leaving about an inch or two of cable extending beyond the fixing bolt. Crimp a brake cable ferrule onto the end of the cable to prevent it from fraying. This will also make it easier to handle the cable during future maintenance.
Tips for a Successful Brake Cable Replacement
Here are some additional tips to ensure a successful replace brake cable bicycle procedure:
- Use high-quality brake cables and housing for optimal performance and durability.
- Lubricate the cable and housing to reduce friction and improve brake feel.
- Double-check all connections and adjustments before riding your bike.
- Consult a professional bike mechanic if you are unsure about any step of the process.
Troubleshooting Common Issues
Even with careful attention, you might encounter some common issues during the replace brake cable bicycle process. Here are some troubleshooting tips:
- Cable slipping: Ensure the cable fixing bolt is tightened securely. If the cable continues to slip, the bolt may be damaged and need replacement.
- Spongy brakes: This could indicate air in the brake lines (for hydraulic brakes) or insufficient cable tension (for mechanical brakes). Bleed the brakes (for hydraulic) or adjust the cable tension (for mechanical).
- Brake pads rubbing: Adjust the brake caliper position or the brake pad position to eliminate rubbing.
Maintaining Your Brakes for Long-Term Performance
Regular maintenance is key to ensuring the longevity and performance of your bicycle brakes. Here are some tips for maintaining your brakes:
- Inspect brake cables and housing regularly for signs of wear and tear.
- Clean brake calipers and rotors/rims to remove dirt and grime.
- Replace brake pads when they become worn or contaminated.
- Lubricate brake levers and pivots to ensure smooth operation.
By following these maintenance tips, you can keep your brakes in top condition and enjoy safe and reliable braking performance for years to come. Replacing your brake cable is a crucial part of bike maintenance and understanding how to replace brake cable bicycle components can save you money and keep you safe.
Conclusion
Replacing a brake cable on your bicycle is a relatively straightforward task that can be accomplished with basic tools and a bit of patience. By following the steps outlined in this guide, you can ensure that your brakes are functioning properly and that you are riding safely. Remember to inspect your brakes regularly and address any issues promptly to prevent potential accidents. Knowing how to replace brake cable bicycle elements empowers you to maintain your bike effectively and enjoy worry-free rides. [See also: Adjusting Bicycle Brakes] [See also: Bicycle Maintenance Checklist] [See also: Types of Bicycle Brakes]
