How to Polish Silver Plated Items: A Comprehensive Guide
Silver plated items, with their elegant sheen, can add a touch of sophistication to any home. However, unlike solid silver, silver plate consists of a thin layer of silver applied over a base metal, making it more susceptible to wear and requiring a gentler approach to cleaning and polishing. Understanding how to polish silver plated items correctly is crucial to preserving their beauty and preventing damage. This comprehensive guide will walk you through the best methods, tools, and precautions to keep your silver plated pieces looking their best for years to come.
Understanding Silver Plate
Before diving into the polishing process, it’s essential to understand what silver plate is and why it requires special care. As mentioned, silver plate is a layer of silver deposited onto a base metal, typically brass, copper, or nickel. This layer is much thinner than solid silver, making it vulnerable to scratching, abrasion, and the eventual wearing away of the silver, exposing the base metal beneath. Therefore, harsh cleaning methods and abrasive polishes should be avoided at all costs.
Identifying Silver Plate
Often, silver plated items are marked with stamps indicating their composition. Look for markings such as “EP” (electroplated), “Silver Plate,” “Quadruple Plate,” or similar indicators. If there are no markings, you can often distinguish silver plate from solid silver by its weight and the presence of wear spots. Solid silver is typically heavier and more durable.
Gathering Your Supplies
To safely and effectively polish silver plated items, you’ll need the following supplies:
- Soft, lint-free cloths: Microfiber cloths are ideal. Avoid using paper towels or abrasive fabrics.
- Gentle silver polish: Specifically formulated for silver plate. Avoid harsh abrasive polishes.
- Mild dish soap: For cleaning before polishing.
- Warm water: For rinsing.
- Soft-bristled brush (optional): For intricate designs or hard-to-reach areas.
- Gloves (optional): To protect your hands and prevent fingerprints.
Step-by-Step Guide to Polishing Silver Plated Items
Follow these steps to safely and effectively polish your silver plated items:
Step 1: Cleaning the Silver Plate
Before polishing, it’s crucial to remove any surface dirt and grime. Mix a small amount of mild dish soap with warm water. Gently wash the silver plated item with a soft cloth or sponge. For intricate designs, use a soft-bristled brush to reach into crevices. Rinse thoroughly with warm water and dry completely with a clean, soft cloth. Ensure the item is completely dry before proceeding to the next step.
Step 2: Applying the Silver Polish
Apply a small amount of silver polish to a clean, soft cloth. Gently rub the polish onto the silver plated surface, using a circular motion. Avoid applying too much pressure, as this can damage the delicate silver plating. Focus on small areas at a time, working your way across the entire item. Be careful not to get polish on any non-silver plated parts, as it may damage them.
Step 3: Buffing the Silver Plate
After applying the polish, use a clean, soft cloth to buff the silver plated surface. This will remove the polish residue and reveal the shine. Again, use a gentle circular motion and avoid applying too much pressure. Continue buffing until the silver plate is clean and shiny.
Step 4: Rinsing (Optional)
Some silver polishes may leave a residue that is difficult to remove by buffing alone. If necessary, you can gently rinse the silver plated item with warm water. However, be sure to dry it immediately and thoroughly with a clean, soft cloth to prevent water spots and tarnish.
Step 5: Drying and Storing
Once the silver plated item is polished and rinsed (if necessary), dry it completely with a clean, soft cloth. Pay close attention to intricate designs and crevices to ensure no moisture remains. Store your silver plated items in a cool, dry place, preferably in a tarnish-resistant bag or container. This will help to protect them from oxidation and keep them looking their best for longer.
Alternative Polishing Methods
While commercial silver polishes are widely available and effective, there are also several alternative methods you can use to polish silver plated items using household ingredients.
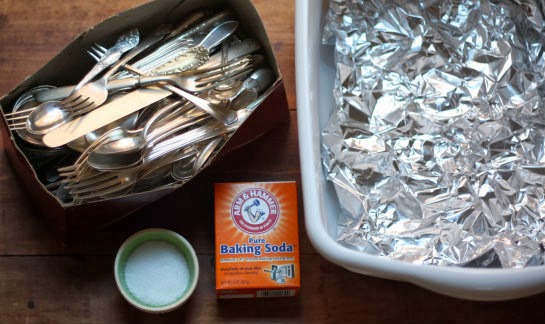
Baking Soda and Aluminum Foil
This method uses a chemical reaction to remove tarnish. Line a glass or plastic container with aluminum foil, shiny side up. Add hot water and baking soda (about 1 tablespoon per cup of water). Place the silver plated item in the solution, ensuring it touches the aluminum foil. The tarnish will transfer from the silver to the aluminum foil. Leave the item in the solution for a few minutes, then rinse and dry thoroughly.
Vinegar and Baking Soda Paste
Mix equal parts vinegar and baking soda to form a paste. Apply the paste to the silver plated item and gently rub with a soft cloth. Rinse thoroughly with warm water and dry completely. This method is effective for removing stubborn tarnish.
Toothpaste
Plain white toothpaste (not gel) can be used as a mild abrasive to polish silver plated items. Apply a small amount of toothpaste to a soft cloth and gently rub onto the silver plated surface. Rinse thoroughly with warm water and dry completely. Be sure to use a non-gel toothpaste to avoid scratching the silver plating.
Preventing Tarnish
Prevention is key to keeping your silver plated items looking their best and reducing the need for frequent polishing. Here are some tips to prevent tarnish:
- Store silver plated items properly: Store them in a cool, dry place, preferably in a tarnish-resistant bag or container.
- Avoid exposure to sulfur: Sulfur is a common cause of tarnish. Avoid storing silver plated items near rubber, wool, or other sulfur-containing materials.
- Handle with care: Avoid touching silver plated items with bare hands, as oils and acids from your skin can contribute to tarnish.
- Clean regularly: Wipe down silver plated items with a soft cloth after each use to remove dirt and fingerprints.
Common Mistakes to Avoid When Polishing Silver Plate
Knowing what *not* to do is just as important as knowing how to polish silver plated items correctly. Here are some common mistakes to avoid:
- Using abrasive polishes: Abrasive polishes can scratch and damage the delicate silver plating. Always use a polish specifically formulated for silver plate.
- Applying too much pressure: Applying too much pressure while polishing can wear away the silver plating. Use a gentle touch and let the polish do the work.
- Using harsh cleaning methods: Harsh cleaning methods, such as scrubbing with abrasive pads, can scratch and damage the silver plating. Use only gentle cleaning methods and soft cloths.
- Leaving moisture on the silver: Leaving moisture on the silver can cause water spots and tarnish. Always dry silver plated items completely after cleaning or polishing.
- Polishing too frequently: Over-polishing can wear away the silver plating. Only polish silver plated items when necessary, and avoid polishing them too frequently.
When to Seek Professional Help
While you can polish silver plated items at home, there are times when it’s best to seek professional help. If your silver plated item is heavily tarnished, damaged, or particularly valuable, it’s best to consult a professional silver restorer. They have the expertise and tools to safely and effectively restore your silver plated items to their original beauty. They will know exactly how to polish silver plated antiques without damaging them. [See also: Restoring Antique Silverware]
Conclusion
Polishing silver plated items requires a gentle touch and the right tools. By following the steps outlined in this guide, you can safely and effectively clean and polish your silver plated pieces, preserving their beauty and extending their lifespan. Remember to avoid harsh cleaning methods, abrasive polishes, and excessive pressure. With proper care and maintenance, your silver plated items will continue to add a touch of elegance to your home for years to come.
