
How to Fix Rust Spots on Your Truck: A Comprehensive Guide
Rust. The bane of every truck owner’s existence. Those unsightly orange blemishes not only detract from your truck’s appearance but also signal a deeper, more insidious problem: corrosion. Left unchecked, rust can weaken your truck’s structural integrity, leading to costly repairs and potentially unsafe driving conditions. This comprehensive guide will walk you through the process of how to fix rust spots on your truck, from identifying the type of rust to performing the necessary repairs. Whether you’re dealing with minor surface rust or more significant corrosion, understanding the steps involved is crucial for preserving your truck’s value and longevity.
Understanding Rust Formation on Trucks
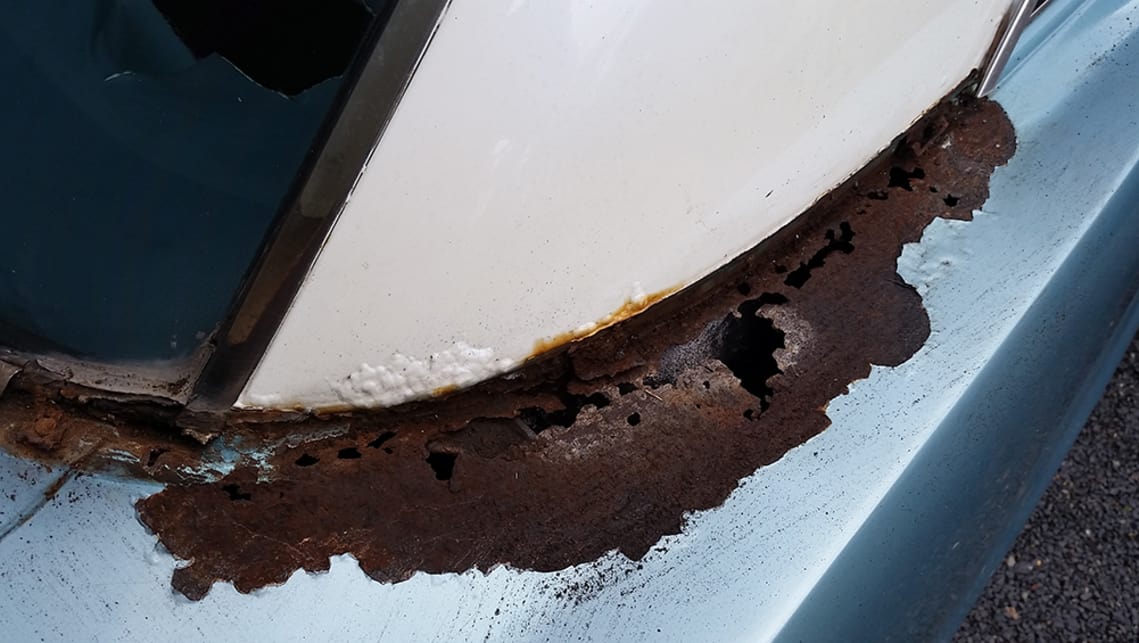
Before diving into the repair process, it’s essential to understand how rust forms in the first place. Rust, or iron oxide, is the result of a chemical reaction between iron, oxygen, and moisture. Trucks, constantly exposed to the elements, are particularly vulnerable. Road salt, rain, snow, and even humidity can accelerate the rusting process. Areas prone to rust include:
- Wheel wells
- Rocker panels
- Lower door panels
- Around windshield and window seals
- Frame
Different types of rust require different approaches. Surface rust, the most common type, affects only the outermost layer of the metal. Scale rust, also known as flaking rust, is more advanced and indicates that the rust has penetrated deeper into the metal. Penetrating rust, the most severe form, eats completely through the metal, creating holes and weakening the structure.
Tools and Materials Needed to Fix Rust Spots
Successfully tackling rust spots on your truck requires the right tools and materials. Here’s a comprehensive list:
- Safety Glasses and Gloves: Essential for protecting your eyes and skin.
- Respirator or Dust Mask: Protects your lungs from dust and fumes.
- Wire Brush: For removing loose rust and paint.
- Sanding Block or Orbital Sander: For smoothing the surface and removing remaining rust. Start with a coarser grit (e.g., 80-grit) and gradually move to finer grits (e.g., 220-grit, 320-grit).
- Rust Converter or Rust Remover: Chemically neutralizes rust and prepares the surface for painting.
- Body Filler (if needed): For filling in dents or holes caused by rust.
- Putty Knife or Spreader: For applying body filler smoothly.
- Primer: Provides a base for the paint and helps prevent future rust.
- Truck Paint (matched to your truck’s color code): Ensures a seamless finish.
- Clear Coat (optional): Adds extra protection and shine.
- Wax and Grease Remover: Cleans the surface before painting.
- Masking Tape and Paper: Protects surrounding areas from overspray.
- Tack Cloth: Removes dust and debris before painting.
- Spray Gun or Aerosol Cans: For applying primer, paint, and clear coat.
Step-by-Step Guide: How to Fix Rust Spots on Your Truck
Now, let’s get down to the nitty-gritty of how to fix rust spots on your truck. Follow these steps carefully for the best results:
Step 1: Preparation is Key
Begin by thoroughly washing the area around the rust spot with soap and water. Dry it completely. Use masking tape and paper to protect the surrounding paint from sanding and overspray. This step is crucial for achieving a professional-looking repair.
Step 2: Rust Removal
Using a wire brush, aggressively scrub the rust spot to remove loose rust and flaking paint. For larger areas or stubborn rust, an orbital sander with a coarse grit sandpaper can be more effective. Work your way down to bare metal, removing all traces of rust. Be sure to wear your safety glasses and respirator during this step.
Step 3: Rust Conversion or Removal
Apply a rust converter or rust remover according to the manufacturer’s instructions. Rust converters chemically neutralize the rust, transforming it into a stable compound that can be painted over. Rust removers, on the other hand, dissolve the rust completely. Choose the product that best suits your needs and follow the directions carefully. [See also: Choosing the Right Rust Converter]
Step 4: Body Filler (If Necessary)
If the rust has created any dents or holes, you’ll need to use body filler to restore the original shape of the panel. Mix the body filler according to the instructions and apply it to the damaged area using a putty knife or spreader. Apply thin layers and allow each layer to dry completely before applying the next. Once the filler is dry, sand it down to match the surrounding surface. Start with a coarser grit sandpaper and gradually move to finer grits for a smooth finish.
Step 5: Sanding and Smoothing
Whether or not you used body filler, it’s important to sand the entire area to create a smooth, even surface for painting. Use a sanding block or orbital sander with progressively finer grits of sandpaper (e.g., 220-grit, 320-grit). Feather the edges of the sanded area to blend it seamlessly with the surrounding paint. Clean the area thoroughly with wax and grease remover to remove any residue.
Step 6: Priming
Apply several thin coats of primer to the prepared surface, allowing each coat to dry completely before applying the next. Primer provides a base for the paint and helps prevent future rust. Use a spray gun or aerosol can for even coverage. Once the primer is dry, lightly sand it with fine-grit sandpaper (e.g., 400-grit) to create a smooth surface for painting. Wipe the area with a tack cloth to remove any dust.
Step 7: Painting
Apply several thin coats of truck paint, matched to your truck’s color code, allowing each coat to dry completely before applying the next. Use a spray gun or aerosol can for even coverage. Hold the spray gun or can approximately 8-10 inches from the surface and use smooth, even strokes. Avoid applying too much paint in one coat, as this can lead to runs and drips. [See also: Matching Your Truck’s Paint Color]
Step 8: Clear Coat (Optional)
If desired, apply several thin coats of clear coat to protect the paint and add extra shine. Allow each coat to dry completely before applying the next. Use a spray gun or aerosol can for even coverage. Once the clear coat is dry, you can buff and polish it for an even more professional-looking finish.
Step 9: Final Touches
Remove the masking tape and paper. Inspect the repaired area for any imperfections and touch up as needed. Clean the surrounding area and apply a coat of wax to protect the paint. Admire your handiwork! You’ve successfully learned how to fix rust spots on your truck.
Preventing Future Rust
Once you’ve repaired the rust, it’s important to take steps to prevent it from returning. Here are some tips for preventing future rust on your truck:
- Wash Your Truck Regularly: Regularly washing your truck, especially during the winter months when road salt is prevalent, can help prevent rust. Pay particular attention to areas prone to rust, such as wheel wells and rocker panels.
- Apply Wax or Sealant: Applying a coat of wax or sealant to your truck’s paint can help protect it from the elements and prevent rust.
- Touch Up Paint Chips and Scratches: Even small paint chips and scratches can expose the metal to the elements and lead to rust. Touch up these imperfections as soon as possible.
- Consider Rustproofing: Consider having your truck rustproofed by a professional. Rustproofing involves applying a protective coating to the undercarriage and other vulnerable areas.
- Store Your Truck Indoors: If possible, store your truck indoors, especially during the winter months. This will help protect it from the elements and prevent rust.
When to Seek Professional Help
While many rust spots on trucks can be fixed DIY, some situations warrant professional help. If the rust is extensive, has penetrated deep into the metal, or affects structural components, it’s best to consult with a qualified auto body technician. Attempting to repair severe rust damage yourself could compromise your truck’s safety and structural integrity. [See also: Finding a Reputable Auto Body Shop]
Conclusion
Fixing rust spots on your truck is a manageable task with the right tools, materials, and knowledge. By following the steps outlined in this guide, you can effectively remove rust, repair damaged areas, and prevent future corrosion. Remember to prioritize safety, take your time, and pay attention to detail. With a little effort, you can keep your truck looking its best and protect its value for years to come. Addressing those rust spots on your truck promptly will save you money and headaches in the long run. Now that you know how to fix rust spots on your truck, get to work and restore your truck to its former glory!
