How to Treat Surface Rust on a Car: A Comprehensive Guide
Surface rust on a car is a common problem, especially in regions with harsh winters or coastal environments. It’s that unsightly orange or brown discoloration that appears on the metal surfaces of your vehicle. While it might seem like a minor cosmetic issue initially, if left untreated, surface rust can quickly escalate into a more serious problem, compromising the structural integrity of your car. Understanding how to treat surface rust on a car effectively is crucial for maintaining its value and longevity. This guide provides a comprehensive overview of identifying, addressing, and preventing surface rust, ensuring your vehicle stays in top condition.
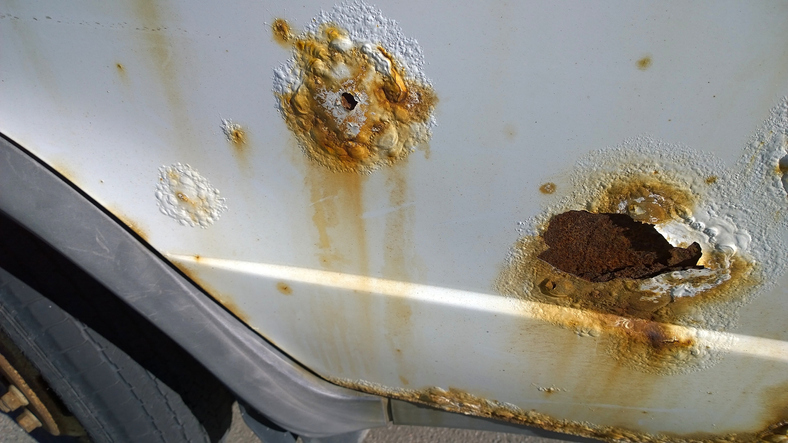
Understanding Surface Rust
Before diving into the treatment methods, it’s important to understand what surface rust actually is. Surface rust, as the name suggests, is the initial stage of corrosion that affects only the outermost layer of the metal. It occurs when iron or steel reacts with oxygen and moisture in the air, forming iron oxide, commonly known as rust. Unlike deeper, penetrating rust, surface rust hasn’t yet compromised the structural integrity of the metal. However, it’s a sign that the protective coating has been breached and that further corrosion is likely if left unattended.
Identifying Surface Rust
Identifying surface rust early is key to preventing more extensive damage. Look for these telltale signs:
- Discoloration: Orange or brown spots or patches on the car’s paint or metal surfaces.
- Rough Texture: The affected area may feel rough or gritty to the touch.
- Bubbling Paint: Small bubbles or blisters appearing under the paint, indicating rust forming beneath.
Common areas where surface rust tends to appear include:
- Wheel wells
- Rocker panels
- Around door edges and handles
- Areas where paint has chipped or scratched
- Underneath the car
Tools and Materials You’ll Need to Treat Surface Rust on a Car
Before you begin, gather the necessary tools and materials. Having everything on hand will make the process smoother and more efficient. Here’s a checklist:
- Safety Gear: Gloves, safety glasses, and a dust mask.
- Cleaning Supplies: Car wash soap, water, and microfiber cloths.
- Sandpaper: Various grits (e.g., 80, 120, 220, 320) for removing rust and smoothing the surface.
- Wire Brush or Rotary Tool with a Wire Brush Attachment: For removing loose rust.
- Rust Converter or Rust Remover: Chemical solutions that neutralize rust.
- Primer: A rust-inhibiting primer to protect the bare metal.
- Car Paint: Matching your car’s color code for a seamless finish.
- Clear Coat: To protect the paint and add shine.
- Masking Tape: To protect surrounding areas from overspray.
- Tack Cloth: To remove dust and debris before painting.
- Applicators: Paintbrushes, spray cans, or a paint sprayer, depending on your preference and the size of the area.
Step-by-Step Guide to Treating Surface Rust on a Car
Now that you have your supplies, let’s walk through the process of treating surface rust on your car. This is a manageable DIY project that can save you money and extend the life of your vehicle.
Step 1: Wash and Dry the Affected Area
Start by thoroughly washing the area around the surface rust with car wash soap and water. This removes any dirt, grime, and contaminants that could interfere with the rust removal process. Rinse well and dry completely with a microfiber cloth. A clean surface is essential for proper adhesion of rust converters and paint.
Step 2: Remove Loose Rust
Use a wire brush or a rotary tool with a wire brush attachment to remove any loose or flaking rust. Apply moderate pressure and work in a circular motion to avoid damaging the surrounding paint. Be thorough but gentle, focusing on removing the rust without grinding into the metal unnecessarily. For larger areas, a rotary tool can significantly speed up this process.
Step 3: Sand the Area
Begin sanding the area with a coarser grit sandpaper (e.g., 80 or 120) to remove the remaining rust and smooth the surface. Work your way up to finer grits (e.g., 220 or 320) to feather the edges of the sanded area and create a smooth transition to the surrounding paint. Sanding is crucial for creating a level surface that will accept primer and paint evenly. [See also: Car Detailing Tips for Beginners]
Step 4: Apply Rust Converter or Rust Remover
Apply a rust converter or rust remover according to the manufacturer’s instructions. Rust converters chemically react with the rust, transforming it into a stable compound that can be painted over. Rust removers dissolve the rust, leaving behind bare metal. Choose the product that best suits your needs and follow the application guidelines carefully. Allow the product to dry completely as directed.
Step 5: Clean the Area
After the rust converter or remover has dried, clean the area thoroughly with a tack cloth to remove any dust, debris, or residue. A clean surface is essential for proper adhesion of the primer and paint. Ensure the area is completely dry before proceeding to the next step.
Step 6: Apply Primer
Apply a thin, even coat of rust-inhibiting primer to the bare metal. Primer provides a protective layer that prevents future rust formation and helps the paint adhere properly. Allow the primer to dry completely according to the manufacturer’s instructions. Multiple thin coats are better than one thick coat to avoid runs and drips.
Step 7: Paint the Area
Apply several thin, even coats of car paint that matches your car’s color code. Allow each coat to dry completely before applying the next. Use a spray can or a paint sprayer for a smooth, professional finish. If using a brush, use light, even strokes to avoid brush marks. Take your time and be patient; a good paint job can make all the difference in the final result. [See also: How to Choose the Right Car Paint]
Step 8: Apply Clear Coat
Once the paint is dry, apply a clear coat to protect the paint and add shine. Apply several thin, even coats, allowing each coat to dry completely before applying the next. Clear coat provides a durable, glossy finish that will protect your paint from the elements and keep your car looking its best.
Step 9: Buff and Polish (Optional)
If desired, you can buff and polish the painted area to further enhance the shine and blend the repair seamlessly with the surrounding paint. Use a polishing compound and a soft cloth or a polishing tool to achieve a smooth, glossy finish. This step is optional but can significantly improve the appearance of the repair.
Preventing Future Surface Rust
Preventing surface rust is always better than treating it. Here are some tips to keep your car rust-free:
- Regular Washing: Wash your car regularly, especially during the winter months when road salt is prevalent.
- Waxing: Apply a coat of wax every few months to protect the paint and create a barrier against moisture and contaminants.
- Touch-Up Paint: Repair any chips or scratches in the paint immediately to prevent rust from forming.
- Undercoating: Consider applying an undercoating to protect the undercarriage of your car from rust.
- Garage Parking: Park your car in a garage or covered area to protect it from the elements.
When to Seek Professional Help
While treating surface rust is a manageable DIY project, there are times when it’s best to seek professional help. If the rust is extensive, has penetrated deep into the metal, or is located in a critical structural area, it’s best to consult with a qualified auto body repair shop. They have the expertise and equipment to handle more complex rust repairs and ensure the structural integrity of your vehicle. Also, if you’re not comfortable performing the repair yourself, don’t hesitate to seek professional assistance.
Conclusion
Treating surface rust on a car is an essential part of vehicle maintenance. By understanding the causes of surface rust, identifying it early, and following the steps outlined in this guide, you can effectively address this common problem and prevent it from escalating into more serious damage. Regular maintenance and preventative measures are key to keeping your car rust-free and ensuring its longevity. Remember, addressing surface rust promptly not only improves the appearance of your car but also protects its value and structural integrity. Learning how to treat surface rust on a car is a valuable skill for any car owner. Don’t let surface rust compromise your vehicle – take action today! Now you know how to treat surface rust on a car.
