The Ultimate Guide to Keyboard Cleaner Tools: Keeping Your Keys Pristine
In today’s digital age, keyboards are ubiquitous. Whether you’re a seasoned professional, a student burning the midnight oil, or simply a casual user, your keyboard is an essential tool for communication, creation, and productivity. However, this constant use inevitably leads to the accumulation of dust, crumbs, and other debris, impacting both hygiene and keyboard performance. That’s where a reliable keyboard cleaner tool becomes indispensable. This comprehensive guide will explore the various types of keyboard cleaner tools available, offer practical cleaning tips, and help you choose the right solutions to maintain a clean and functional keyboard.
Why Keyboard Cleaning Matters
Beyond aesthetics, regular keyboard cleaning is crucial for several reasons:
- Hygiene: Keyboards harbor bacteria and germs. Cleaning reduces the risk of spreading illness.
- Performance: Debris can interfere with key functionality, leading to sticky keys or unresponsive commands.
- Longevity: Keeping your keyboard clean prevents the buildup of corrosive substances that can damage internal components.
- Aesthetics: A clean keyboard simply looks more professional and pleasant to use.
Types of Keyboard Cleaner Tools
Several types of keyboard cleaner tools are available, each designed for specific cleaning needs and keyboard types.
Compressed Air
Compressed air is a popular and effective option for blasting away loose particles from between keys. It’s particularly useful for removing dust, crumbs, and pet hair. When using compressed air, hold the can upright and use short bursts to avoid damaging the keyboard. Always disconnect the keyboard from the power source before cleaning.
Keyboard Cleaning Gel
Keyboard cleaning gel, also known as cleaning putty or slime, is a non-toxic, reusable substance that molds to the shape of your keyboard. It effectively picks up dirt and debris from hard-to-reach areas. Simply press the gel onto the keyboard, allowing it to conform to the keys, and then peel it away, taking the dirt with it. This is a mess-free and efficient solution. [See also: Best Practices for Cleaning Electronics]
Microfiber Cloths
A microfiber cloth is an essential tool for wiping down the surface of your keyboard. It’s gentle on the keys and effectively removes smudges, fingerprints, and surface dirt. Dampen the cloth slightly with water or a keyboard-safe cleaning solution for optimal results. Avoid using abrasive cloths or harsh chemicals that can damage the keyboard’s finish.
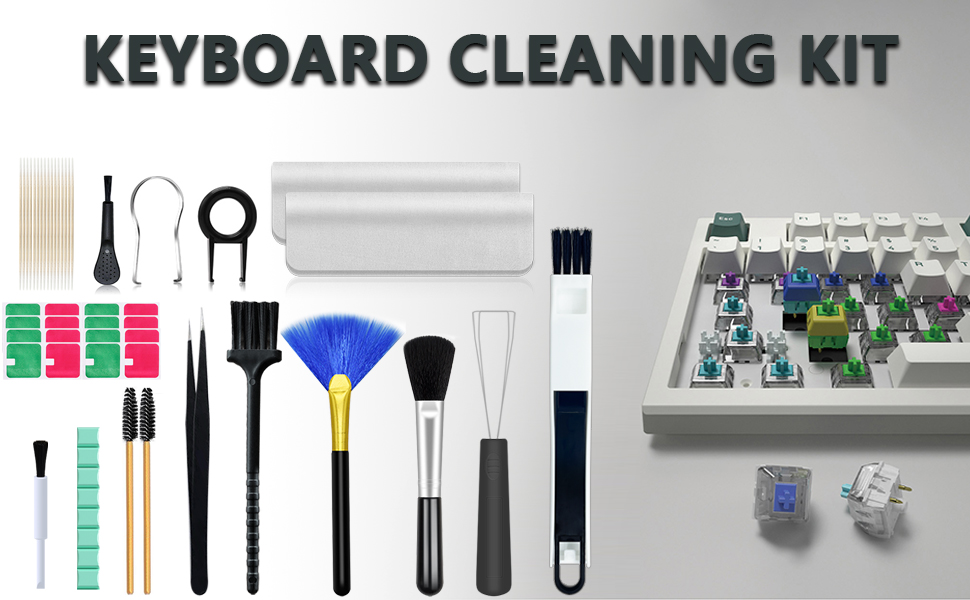
Keyboard Cleaning Brushes
Keyboard cleaning brushes come in various shapes and sizes, designed to reach into crevices and remove stubborn dirt. A small, soft-bristled brush is ideal for cleaning around the edges of the keys, while a larger brush can be used to sweep across the entire keyboard surface. Some brushes also feature a keycap puller, which allows you to remove individual keycaps for more thorough cleaning.
Vacuum Cleaners (with attachments)
A small handheld vacuum cleaner with appropriate attachments can be used to suck up loose debris from your keyboard. Make sure the attachment is designed for delicate surfaces to avoid scratching the keys. Use a low suction setting to prevent damage. This is a good option for keyboards that accumulate a lot of dust and crumbs.
Step-by-Step Guide to Cleaning Your Keyboard
Follow these steps for a thorough keyboard cleaning:
- Disconnect the Keyboard: Always disconnect your keyboard from the power source or computer before cleaning.
- Turn it Upside Down: Gently shake the keyboard upside down to dislodge any loose debris.
- Use Compressed Air: Blast compressed air between the keys to remove dust and crumbs.
- Wipe with a Microfiber Cloth: Dampen a microfiber cloth with water or a keyboard-safe cleaning solution and wipe down the surface of the keys.
- Use Cleaning Gel: Press keyboard cleaning gel onto the keys and peel it away to remove stubborn dirt.
- Brush the Edges: Use a keyboard cleaning brush to clean around the edges of the keys and in hard-to-reach areas.
- Clean Keycaps (Optional): If desired, remove the keycaps using a keycap puller and clean them separately with soap and water. Make sure they are completely dry before reattaching them.
- Vacuum (Optional): Use a handheld vacuum cleaner with a delicate attachment to suck up any remaining debris.
- Reconnect the Keyboard: Once the keyboard is completely dry, reconnect it to your computer.
Choosing the Right Keyboard Cleaner Tool
The best keyboard cleaner tool for you will depend on your specific needs and preferences. Consider the following factors:
- Type of Keyboard: Mechanical keyboards may require more specialized cleaning tools than standard membrane keyboards.
- Frequency of Cleaning: If you clean your keyboard regularly, a simple microfiber cloth and compressed air may suffice. If you neglect cleaning for extended periods, you may need more powerful tools like cleaning gel or a vacuum cleaner.
- Budget: Keyboard cleaner tools range in price from inexpensive microfiber cloths to more expensive electronic cleaning kits. Choose a tool that fits your budget.
- Ease of Use: Consider how easy the tool is to use and maintain. Some tools, like cleaning gel, are very straightforward, while others, like vacuum cleaners, may require more effort.
Keyboard Cleaning Solutions: What to Use and What to Avoid
When cleaning your keyboard, it’s important to use the right cleaning solutions to avoid damaging the keys or internal components. Here are some recommendations:
Safe Cleaning Solutions
- Water: A slightly damp microfiber cloth with water is generally safe for cleaning the surface of your keyboard.
- Isopropyl Alcohol: Diluted isopropyl alcohol (70% or less) can be used to disinfect the keyboard and remove stubborn stains. Apply it sparingly to a microfiber cloth and avoid getting it inside the keyboard.
- Keyboard-Safe Cleaning Solutions: Many commercially available keyboard cleaning solutions are specifically formulated to be safe and effective for cleaning keyboards. Follow the manufacturer’s instructions carefully.
Solutions to Avoid
- Harsh Chemicals: Avoid using harsh chemicals like bleach, ammonia, or window cleaner, as these can damage the keyboard’s finish and internal components.
- Abrasive Cleaners: Do not use abrasive cleaners or scouring pads, as these can scratch the keys.
- Excessive Liquids: Avoid using excessive amounts of liquid, as this can seep into the keyboard and cause damage.
Maintaining a Clean Keyboard: Preventative Measures
Preventing dirt and debris from accumulating on your keyboard can significantly reduce the need for frequent cleaning. Here are some preventative measures you can take:
- Wash Your Hands: Wash your hands regularly to avoid transferring dirt and oil to your keyboard.
- Avoid Eating and Drinking Near Your Keyboard: Food and drinks can easily spill onto your keyboard, attracting dirt and bacteria.
- Use a Keyboard Cover: A keyboard cover can protect your keyboard from dust, spills, and other debris.
- Regular Dusting: Dust your keyboard regularly to prevent the buildup of dust and dirt.
The Future of Keyboard Cleaning
As technology advances, we can expect to see even more innovative keyboard cleaner tools emerge. Self-cleaning keyboards with antimicrobial coatings are already in development, promising to revolutionize keyboard hygiene. In the meantime, the tools and techniques outlined in this guide will help you keep your keyboard clean and functional for years to come. [See also: Innovations in Computer Hardware]
Conclusion
Maintaining a clean keyboard is essential for hygiene, performance, and longevity. By understanding the different types of keyboard cleaner tools available and following the tips outlined in this guide, you can keep your keyboard pristine and enjoy a more pleasant and productive computing experience. Whether you opt for a simple can of compressed air or a more comprehensive cleaning kit, the key is to establish a regular cleaning routine and take preventative measures to minimize dirt and debris buildup. Invest in the right keyboard cleaner tool today and experience the difference a clean keyboard can make.
