How to Clean Out a Lawn Mower Carburetor: A Step-by-Step Guide
A sputtering engine, difficulty starting, or rough idling are all telltale signs that your lawn mower carburetor might be clogged. The carburetor is a crucial component responsible for mixing air and fuel in the correct ratio to ensure smooth engine operation. Over time, gum, varnish, and other deposits can accumulate, leading to performance issues. Learning how to clean out a lawn mower carburetor is a valuable skill that can save you money on costly repairs and keep your lawn mower running efficiently for years to come. This comprehensive guide will walk you through the process, step by step, ensuring you can tackle this maintenance task with confidence.
Why a Clean Carburetor Matters
Before diving into the cleaning process, it’s important to understand why a clean carburetor is essential for your lawn mower’s performance. A clogged carburetor restricts the flow of fuel and air, disrupting the delicate balance required for proper combustion. This can lead to a variety of problems, including:
- Difficulty Starting: The engine struggles to get enough fuel to ignite.
- Rough Idling: The engine runs unevenly or stalls when idling.
- Poor Performance: The engine lacks power and struggles to cut grass effectively.
- Increased Fuel Consumption: The engine wastes fuel due to inefficient combustion.
- Engine Damage: In severe cases, a clogged carburetor can lead to engine damage.
Regularly cleaning your lawn mower carburetor can prevent these issues and extend the life of your engine. It’s a relatively simple task that can save you time, money, and frustration in the long run. Knowing how to clean out a lawn mower carburetor keeps your machine running optimally.
Tools and Materials You’ll Need
Before you begin, gather the necessary tools and materials. Having everything on hand will make the process smoother and more efficient. Here’s a list of what you’ll need:
- Socket Wrench Set: For removing bolts and screws.
- Screwdrivers (Phillips and Flathead): For various adjustments and disassembly.
- Carburetor Cleaner: A solvent specifically designed to dissolve gum and varnish.
- Small Brushes: For scrubbing away stubborn deposits. An old toothbrush works well.
- Compressed Air: For blowing out passages and drying components.
- Clean Rags: For wiping down parts and cleaning up spills.
- Safety Glasses: To protect your eyes from debris and chemicals.
- Gloves: To protect your hands from chemicals and grime.
- Carburetor Diagram (Optional): A diagram can be helpful for reassembly, especially if you’re not familiar with the carburetor’s layout. You can usually find one online by searching for your lawn mower model number.
- Fuel Stabilizer: To prevent future carburetor clogs.
Step-by-Step Guide: Cleaning Your Lawn Mower Carburetor
Now that you have your tools and materials ready, let’s get started. Follow these steps carefully to clean out a lawn mower carburetor effectively.
Step 1: Disconnect the Spark Plug
Safety first! Disconnect the spark plug wire from the spark plug to prevent accidental starting. This is a crucial step to avoid injury.
Step 2: Drain the Fuel Tank
Drain the fuel tank to prevent fuel spillage during the carburetor removal process. You can use a siphon or carefully tip the lawn mower over a suitable container. Dispose of the fuel properly according to local regulations.
Step 3: Remove the Air Filter
Remove the air filter cover and the air filter itself. Inspect the air filter and replace it if it’s dirty or damaged. A clean air filter is essential for proper engine performance. [See also: How to Replace a Lawn Mower Air Filter]
Step 4: Disconnect Fuel Lines and Linkages
Carefully disconnect the fuel lines from the carburetor. Use pliers if necessary. Be prepared for a small amount of fuel spillage. Also, disconnect any linkages connected to the carburetor, such as the throttle and choke controls. Take photos before disconnecting everything to help with reassembly.
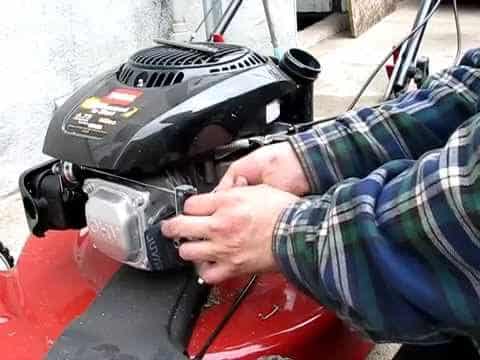
Step 5: Remove the Carburetor
Unbolt the carburetor from the engine. The number and size of bolts may vary depending on your lawn mower model. Carefully remove the carburetor, being mindful of any gaskets or O-rings that may be present. These components are crucial for sealing the carburetor and preventing leaks.
Step 6: Disassemble the Carburetor
Disassemble the carburetor carefully. This usually involves removing the float bowl, float, needle valve, and jets. Pay close attention to the order of the components and take photos as you go to aid in reassembly. Be very careful not to damage any of the small parts, especially the jets, as they are easily bent or broken.
Step 7: Clean the Carburetor Components
This is the most important step in learning how to clean out a lawn mower carburetor. Spray all the carburetor components with carburetor cleaner. Use small brushes to scrub away any stubborn deposits. Pay particular attention to the jets, as these are prone to clogging. Use a thin wire or carburetor cleaning tool to carefully clear any blockages in the jets. Make sure all passages are clear and free of debris.
Step 8: Rinse and Dry the Components
Rinse all the carburetor components with carburetor cleaner and then dry them thoroughly with compressed air. Make sure there is no remaining cleaner or moisture before reassembling the carburetor.
Step 9: Reassemble the Carburetor
Reassemble the carburetor in the reverse order of disassembly. Refer to your photos or carburetor diagram to ensure you reassemble everything correctly. Make sure all gaskets and O-rings are in good condition and properly seated. Replace them if necessary. Properly reassembling after you clean out a lawn mower carburetor is paramount.
Step 10: Reinstall the Carburetor
Reinstall the carburetor onto the engine. Tighten the bolts securely, but be careful not to overtighten them. Reconnect the fuel lines and linkages, making sure they are properly attached.
Step 11: Reinstall the Air Filter
Reinstall the air filter and air filter cover. Make sure the air filter is properly seated and the cover is securely fastened.
Step 12: Reconnect the Spark Plug
Reconnect the spark plug wire to the spark plug.
Step 13: Refuel and Start the Engine
Refuel the lawn mower and try starting the engine. It may take a few tries for the engine to start, especially if the fuel lines were completely empty. Once the engine starts, let it run for a few minutes to warm up. Check for any fuel leaks and address them immediately.
Preventing Future Carburetor Clogs
Once you’ve successfully clean out a lawn mower carburetor, it’s important to take steps to prevent future clogs. Here are a few tips:
- Use Fuel Stabilizer: Add fuel stabilizer to your fuel tank, especially when storing your lawn mower for extended periods. Fuel stabilizer prevents fuel from breaking down and forming gum and varnish.
- Drain the Fuel Tank: If you’re storing your lawn mower for the winter, drain the fuel tank completely. This will prevent fuel from sitting in the carburetor and causing clogs.
- Use Fresh Fuel: Avoid using old or stale fuel. Fresh fuel burns more cleanly and is less likely to cause carburetor problems.
- Regular Maintenance: Perform regular maintenance on your lawn mower, including changing the oil, cleaning the air filter, and inspecting the spark plug. [See also: Lawn Mower Maintenance Checklist]
Troubleshooting Common Problems After Cleaning
Even after you’ve carefully followed these steps to clean out a lawn mower carburetor, you may still encounter some problems. Here are a few common issues and how to troubleshoot them:
- Engine Still Won’t Start: Double-check that the spark plug is properly connected and that there is fuel in the tank. Also, make sure the fuel lines are not kinked or blocked.
- Engine Runs Rough: This could be due to a vacuum leak or improperly adjusted carburetor settings. Check for any loose connections or damaged gaskets.
- Engine Stalls Frequently: This could be due to a lean fuel mixture. Try adjusting the carburetor settings or cleaning the jets again.
- Fuel Leaks: Check for any damaged fuel lines or gaskets. Replace them if necessary.
When to Seek Professional Help
If you’ve tried cleaning your lawn mower carburetor yourself and you’re still experiencing problems, it may be time to seek professional help. A qualified lawn mower mechanic can diagnose the problem and perform any necessary repairs. Knowing how to clean out a lawn mower carburetor is helpful, but sometimes professional assistance is required.
Conclusion
Cleaning out a lawn mower carburetor is a manageable task that can significantly improve your lawn mower’s performance and extend its lifespan. By following these step-by-step instructions and taking preventative measures, you can keep your lawn mower running smoothly for years to come. Remember to always prioritize safety and consult your owner’s manual for specific instructions related to your lawn mower model. With a little patience and effort, you can master this essential maintenance skill and enjoy a healthy, well-manicured lawn.
